How to Make a Compost Heap: Recycling your Grass Cuttings and Much More
One of the biggest problems encountered in lawn care is disposal of the grass cuttings, which over the course of a season can amount to a substantial quantity. This is where composting can be of great benefit, not only providing a way to dispose of the grass cuttings, and a variety of other garden and household waste, but then turns this waste into a lovely friable compost which can be used around the garden in a variety of ways.
What is Compost, and How Does it Work?
Composting is a microbiological process in which organic materials are decomposed by the activity of microorganisms. To enable them to do their job the conditions must be created in which these microorganisms can thrive. The main criteria for this are good aeration and heat. At a temperature of around seventy five degrees Fahrenheit the micro-organisms’ activity begins to generates extra heat, which in a good compost heap will rise to between 140 to 170 degrees Fahrenheit over the following few weeks.

As the material decomposes the microorganisms activity slows and the heat drops to near ambient air temperature – all occurring anywhere from four weeks up to around four months. This is the ideal time to turn the heap which, by introducing more air, promotes a secondary decomposition process. I have always found it very usefull to add a few kilos of granulated urea during this turning process to help accelerate the decomposition. Some well rotted manure added in thin layers will do the same.
A compost heap can be formed in even the smallest of gardens. Purpose built compost bins are now readily available from local councils and commonly at a very reduced rate thanks to local composting initiatives. Also, shops and garden centres will normally offer a variety of sizes at very reasonable prices – it doesn’t take much material to create a thin plastic container after all! In larger gardens, though, I would certainly suggest building a customised compost heap.
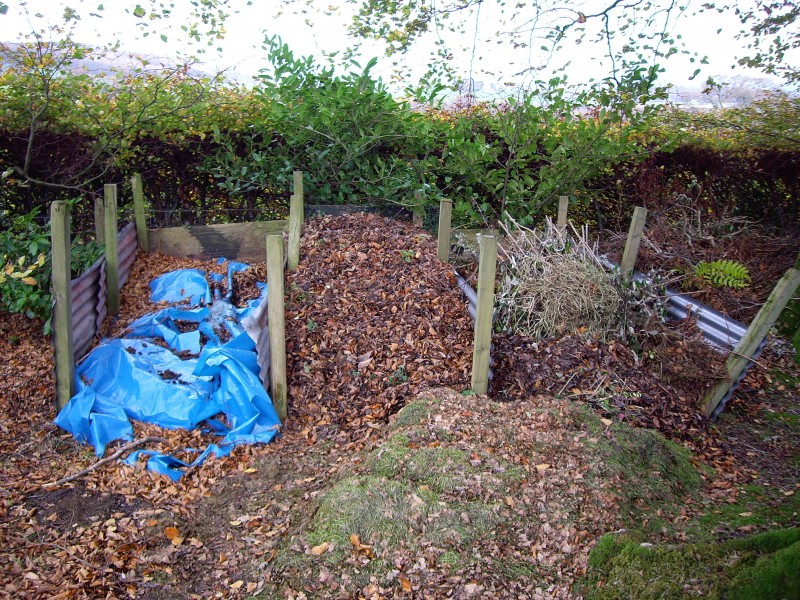
A good example of a home made compost heap. The bay on the left is ready for emptying, the middle ready for covering, and the material on the right will form a new heap with the wilted grass at the front.
How to Build your own Compost Heap
Learning how to make a compost heap is surprisingly simple, and I’ll take you through the full process here. Ideally the compost heap would consist of three bays, each around three metres long by two metres wide by one metre high, all built on a soil or other free draining base. The sides and partitions can be formed from planks, corrugated iron or heavy duty wire mesh. If using mesh the sides should be lined with old carpet or plastic sheeting. The size can be variable of course depending on your individual storage requirements.

The reason for separating your compost heap into three bays is to allow each individual heap to be turned at least once during the composting process. This turning, as I’ve mentioned, speeds up the decomposition process and gives a much more friable finished product.
What can I put on a compost heap?
Whatever type of composter you are using it is very important to ensure that the materials being used are suitable, as otherwise the heap can end up as a soggy stinking mess and also attract all sorts of insect and animal pests. Building the heap with alternate layers of green and brown compostable material will ensure there is plenty of air in the heap and allow the microorganisms to start doing their work.
The green material consists of all your standard garden material such as grass cuttings, weeds, manure with straw (from rabbit hutches for instance), vegetables, hedge clippings, and cut flowers. If you live near the sea some seaweed will work wonders as well adding to the effect of the eventual compost fertilizer.
The brown material includes Autumn leaves, torn up cardboard and magazines, teabags, egg boxes, scrunched up newspaper and clearings from the perennial bed.
Woodier material such as tree prunings are good if put through a shredder, but otherwise they need to be burned on the bonfire before their ashes are added to the heap. Although, if you have a spare corner in the garden you could create a pile of twigs, prunings and small logs to make a fantastic Winter home for a variety of garden friendly wildlife.
Materials that should never be used on a compost heap are meat, fish, bread, dairy products, dog and cat poo, and plastics. These will all create the wrong type of decomposition and produce more smell and mess than usable fertiliser.
How to Start your Compost Heap
In learning how to make a compost heap, I would always advise starting with a layer of the brown material 15 to 20 cm thick. You would then follow this up with a green layer of the same depth. This double layer would be repeated – brown, green, brown, green – until the heap is full. After each layer of one colour tread over it to lightly compact the material and even out the compost mix. Once the bay or compost bin is full cover the top with an old carpet, tarpaulin or plastic sheet and leave it in peace till it is time to turn it over. If the weather is very dry when building a heap it must be well watered before covering to help start the decomposition process.

In most gardens it is not an option to build a heap all in one go, except in the Autumn, so it is important to ensure the materials are well mixed as they are added throughout the season, ensuring it is treaded lightly every 20cm in depth or so, and watered in dry weather. Grass is best wilted before going onto the heap so can be set aside and added as required, and all the household waste can be mixed in as the heap builds. Once the heap is full give it a final tread then cover as before.
It sounds like a lot of effort to make your own compost, although it does save all that bagging and trips to the tip, but, believe me, it is well worth it because of the savings in buying compost and other fertilizers at the garden centre. You’ll also be amazed by the huge improvements that can be made to the quality of the soil in all parts of your garden by adding your your own home made garden gold.
I hope this article has given you a good idea of how to get started on your own composting project, but if you need any more tips or advice feel free to drop me a line on our contact page. Or, alternatively, leave me a comment below with any questions you have. I’ll do my best to answer all your compost questions.
Happy composting, Duncan.
can you add spent compost eg potbound plants,with compost
Hi Mary, sorry for the delay in replying.
Spent compost is a very good addition to the compost heap at any time. If it is from rootbound pots then you should break it up with the spade or a shredder before adding it to the heap. A tip worth remembering to speed up the composting process is to sprinkle some sulphate of ammonia or granulated urea over the heap every time a new layer is added. Happy composting, Duncan.